 |
| Boolean Operations |
 |
 |
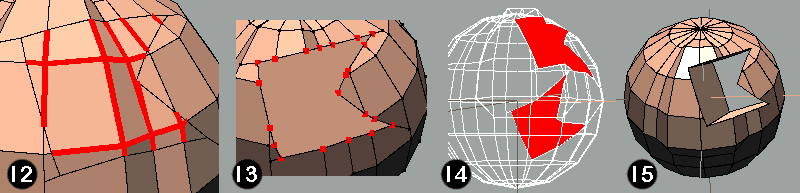
| 12). Select all edges contained within the boundary region. 13). Dissolve edges and do a quick vert check to see how many verts constitute the 'boundary' edge (select face, press v) - note No. of verts. Repeat the whole procedure for the other region and compare the 2 vert counts. These have to be identical to allow a bridge operation to work correctly. In this case, there was an initial discrepancy of 3 (18 / 21) - introduce new verts on appropriate edges using cut (n) - doing this in a 'sensible' manner makes sense, imo. (ie, try to equalise vert counts on corresponding edges along sections of the boundary region) |
| Boolean operations in Wings3D - one approach (of many, I suspect) First of all - don't bother reading any more if you're looking for : A three click workflow (like Rhino 3D or similar) A mathematically precise series of solutions. However, if 'eyeball accuracy' is sufficient - then the following method may well be ok. (NB - you no longer have to settle for 'eyeball' accuracy - if you use the Intersect plugin - see notes below) Draw Loop and Slide Vert plugins are essential for the following method (both written by clacos and excellect, imo). What follows is technically possible using the standard Wings toolset - but would be even more tedious. The basis of this method is to 'draw' the 'line of intersection' on the surface of the appropriate objects and then use Face | Bridge to produce a 'Boolean' effect. In the first case, it is used to 'punch' a hole through the appropriate object. Although this 'line of intersection' has been 'hand drawn' the rest of the geometry (beyond this line) will be unaffected in terms of original accuracy - this applies to all the examples outlined below. Changes due to Wings updates. All of the examples here were done before Object | Weld was available. Although I've not actually tried this method using Weld (instead of Bridge), I see no reason why it shouldn't work, as Weld is essentially a Bridge operation anyway. bridgeweld Care would still have to be taken, of course, to match vert counts on the mating faces and Invert appropriate portions where necessary. More changes. (Sept '04) Two recent additions make life somewhat easier re this topic - imo. Tools | Connect does essentially the same job as Clacos' DrawLoop plugin - but has the distinct advantage of being part of the Wings' core code - so will be (automatically) updated when new versions of Wings are released. Vert | Intersect and Edge | Intersect - this plugin (by Elrond79) finds the intersection point between relevant selected elements - eg an edge and a (specified) plane - this is exactly what is needed for doing Boolean type jobs (as well as many others) - see intersect info on main page (0.98.25 needed) A workflow that I've employed when using these facilities has involved using Tools | Connect to quickly 'draw' a line of intersection (add verts afterwards to 'connected edges' as and where necessary) then use the Intersect plugin to move / adjust geometry to the correct positions - rather than eyeballing, as originally described here. Although it's unlikely that people will rush away and start doing 'Booleans' after reading these notes, the techniques have wider use in 'normal' modelling :) |
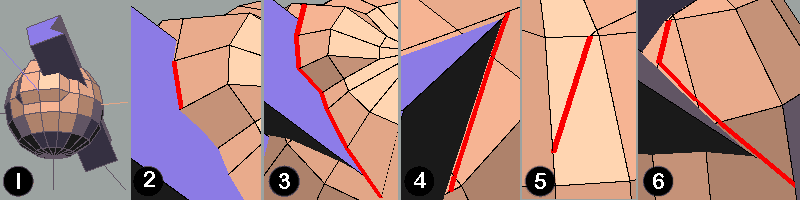
| 1).The two objects being used for this example - subtracting the modified prism from the sphere will be the specific operation. I applied different colours to these objects to try to make things easier. 2). Using Draw Loop, make a start somewhere / anywhere on the surface of the sphere, so that the edge joining the first 2 (newly drawn) verts will be approximately parallel (and quite close) to the interface between the 2 objects. This image shows the situation after the first 2 (new) edges have been 'drawn'. (Use whichever 'draw' mode in the plugin you're comfortable with)This view is looking down on the objects from the 'bumped' side of the sphere. 3). The situation after completing the topmost series of (six) edges. Note how both the first (and last) edges 'overrun' the blue object - this is ok, since new verts will be needed somewhere along these edges to provide the 'anchor' points for the 'corners' of the boundary loop being drawn on the surface of the sphere. |
| 7). Underside edges of new boundary, following on from 'corner point' shown in (6). 8). Final series of edges to get back to the start point. After completing these 'boundary' edges, repeat the procedure on the other side of the sphere where the rod protrudes (not shown). 9). Check all around both regions for problem situations / missing edges / anomolies etc - this is one I'd overlooked - correct anything you find and amend really troublesome bits of geometry that may lead to confusion later on. |
 |
| Boolean Subtraction - case 2 1). The two original (intersecting) objects. Both of these have had their lines of intersection 'drawn' on their surfaces, using the technique previously described.However, if boundary edges on both objects are needed, it is possible to 'cheat' a little and make life slightly easier in the process :)Draw a 'boundary loop' around one object and adjust it to get a good 'fit'. Then draw the loop around the second object - but in a fairly loose manner. On a vert by vert basis, choose a vert on the 'loose' loop, apply Vert -> Scale | Uniform (to a point, RMB option) and click on the corresponding vert on the other object's (accurate) loop. RMB to execute and drag (constrained, 0%), this procedure will precisely align the first vert to the second. Repeat until all verts are matched. Check vert count matches. Separate the two objects (use constrained move) to enable work to be more easily carried out on each object. 2). Take the object that will 'have a piece removed', and select all edges contained within the newly drawn 'boundary loop' |
 |
| Boolean Union 1). The two original (intersecting) objects. Both of these have had their lines of intersection 'drawn' on their surfaces, using the technique previously described. However, it is possible to 'cheat' a little (as in previous example) 2). Separate objects (as before) for convenience, select unwanted edges (on first object) and dissolve (or use loop cut and delete) 3). Select the boundary loop on the second object |
 |
| Boolean Subtraction - case 3 1). The two original (intersecting) objects. Both of these have had their lines of intersection 'drawn' on their surfaces, using the technique previously described. 'Cheat' using the workflow described (Scale | Uniform (to a point - 100%) if it helps. Separate the two objects (use constrained move) to make things easier. 2). Select edgeloop, loopcut and select unwanted portion. 3). Delete unwanted portion 4). Select boundary loop on the second object. |
| Boolean Subtraction - Case 1 |
| Boolean Subtraction - Case 2 |
| Boolean Subtraction - Case 3 |
| Boolean Union |
| 4). First three new edges after turning the corner (shown lower R in (3)). 5). If you reach a situation where the next edge required for the draw operation is obscured by the 2nd (blue) object, hide this object - as here - draw the edge - then show the hidden object again after drawing the line. 6). Note how 'inaccurate' the (upper) edge done in (5) is - because the 2nd object was hidden during the draw procedure and therefore no visual reference was available - but this doesn't matter, it will be adjusted later. Three subsequent edges following on from this 'difficult' edge are also shown here. |
| 10). Go around all the new edges, using the Slide Vert plugin and adjust the verts to get the best alignment (with the 'join' between the two objects) that you can. Zooming / tumbling and using Aim helps in this operation (remember that Aim still works in DLoop mode if you select a vert and press a) At times you may find it quite difficult to get things as you'd ideally like them to be, because the smallest vert movement available (via DLoop) is too coarse for the necessary adjustment. Compromise. Do not distort the 'original geometry edges' of the sphere when carrying out this procedure - only 'slide' verts along original edges as the intention is not to distort or modify original geometry, only draw a line of edges on its surface 11). The uppermost region of intersection after final adjustment of the newly drawn boundary edges. |
| 14). Both regions selected, ready for bridging, after checking (and amending) the boundary edges. 15). Finished object after the bridge op, with 'construction edges' removed. In a 'real' situation - it would be up to the user to join the new verts up to the existing (original) to maintain geometry as required (all quads / tris or whatever) A reasonable way of checking the 'through' hole in this type of situation is to switch to ortho / wireframe mode and tumble object so you can line up / eyeball the geometry. |
| 3). Dissolve these edges. 4). Take the object that's forming the 'hole' and select all edges that constitute its boundary loop. 5). Apply loop cut and ensure correct piece (for deletion) is selected. We need to keep the portion that forms the 'inner faces' of the 'hole' 6). Required portion after loop cut op and discarding unwanted portion. 7). Select whole object and apply Object | Invert, because we need the 'inside faces' of this object. 8). Select the 2 faces that will be bridged (outer face of inner object and inner face of outer object) and use Store | Selection. Re-align both objects using another constrained move (in opposite direction to (1) ). Recall | Selection and apply Face | Bridge. Cleanup. Eyeball vert count before (and after) cleanup op, and bear in mind what the vert count around a boundary edge was - the post cleanup figure should reduce by this amount. Join up new geometry with old as desired. |
| 5). Apply loop cut and ensure correct piece (for deletion) is selected. (Here we only need to keep the portion that will define the part of the cylinder that is in intimate contact with the surface of the other object) 6). Loopcut and discard unwanted portion, then select whole object and apply Object | Inverse as here we need the geometry on the 'inside' faces, rather than the original exterior. 7). Item as shown in (6) after Inverse op. 8). First object (rotated) showing the face that will be bridged with the portion shown in (7) 9). Select both (bridge) faces and Store | selection. Re-align objects using a constrained move, Recall | Selection, Face | Bridge and cleanup |
| 4). Loopcut and select the unwanted region. 5). Object after loopcut operation with unwanted portion deleted. 6). Select common face (on both objects) and use Selection | Store Selection 7). Re-align objects, Recall | Selection, Bridge and Cleanup - now have a single item. |