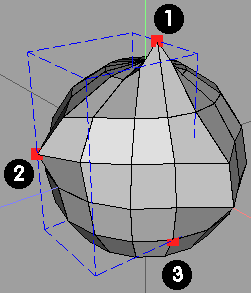
In essence, the user selects (and defines) a destination point (the BBox centre), then moves an object (or objects) to that point, in a manner controlled by a second selection.
A bounding box (in general terms) is like an imaginary volume that completely (but only just) contains a piece of (selected) geometry. (Somewhat like having a shoe-box that's only just big enough for its contents)
The actual dimensions of the BB are defined by the maximum and minimum values of the selected verts along each of the X,Y and Z axes. (Eg the vert with the most positive X co-ordinate will define where the most positive X plane lies - and so on for the other 5 'sides' of the BB)
The sides of the BB are parallel to the 3 main axes, X, Y and Z and a saved BB can be displayed (in blue) by checking the View | Saved BB option
[If you're unsure about BBs, try creating a sphere, switch on View | Show Saved BB, change to wireframe, view XYZ, ortho and start selecting bits of the sphere.
After each selection (change) made to the sphere, use Tools | Save BB and watch how the shape and size of the (blue) BB display changes to (just) include the new limits / extremities.(This is made very easy if Save BB is on a hotkey)]
The geometric mid-point of any piece of geometry saved as a BB is the crucial feature. This lies at the intersection of the BB's internal diagonals and defines the exact nature of the way objects are aligned after Move to Saved BB has been used..
Vert 2 defines maximum +Z face position (and minimum -X face)
Vert 3 defines maximum +X face position (and minimum -Y face)
An interesting (and very useful) aspect of Wings is that an individual vert can be saved as the BB. This feature allows for extremely accurate alignment procedures because of the inherant precision of a single vert - displaying a blue 'box' around a vert is, however, somewhat impractical :)
Using the Move to Saved BB command will not apply any type of rotation to the object being moved (unlike Face | Put On, for instance). The moved object will only be moved along the X, Y or Z axes (or a combination)
After a selection has been defined (and saved) as a BB, another piece of geometry is usually selected, with the intention of aligning this to the centre (or 'hot spot') of the saved BB
This (second) selection also has a (invisible) BB around it, with its own centre of course. It is the BB centre (of this second object) that will be aligned with the saved BB centre after applying Tools | Move to Saved BB. Since this is an Object level operation, the object(s) associated with the second selection moves as a whole - no geometry distortion or modification takes place.
It is important to realise that a BBox needed actually be a 'box' as we generally think of such an item in the 'real' world - ie something that exists in all 3 dimensions. A flat plane, lying parallel to an XYZ axis will essentially only have a 'Bounding Rectangle' without any practical depth to it ('hot spot' where the diagonals cross)
Likewise, a single edge, lying parallel to an axis, will only show as a straight line ('hot spot' being the mid point) If the edge is rotated, however, its BB will display as either a rectangle or a box - depending on how it's rotated.
For the following cube / hemisphere example, the Tools | Move to Saved BB -> All option has been used

1). Two objects, one of which will remain stationary (hemisphere), the other of which will move (cube)
2). Select a feature (north 'pole' vert here) on the 'non mover' and apply Tools | Save BB.
3). Deselect the feature chosen in (2) and select a feature on the 'mover' object. Note that the BB centre of this 'mover' feature will align with the saved BB centre. Here, a vert on a lower corner of the cube was selected. Apply Tools | Move to Saved BB, The result is shown here, in (3) Since a vert was chosen on both objects, they now occupy the same location in 3D space.
4). Here, an edge was chosen on the 'mover', so its BB mid point becomes aligned with the saved BB centre.
5). As (3) and (4), but the BB centre (of the selected cube face) is now aligned.
6). As above, but here the BB is around the whole object and thus the BB centre is 'inside' the cube (hot spot being where the diagonals intersect)

1) Select a piece of geometry whose BB centre will provide the required 'destination point' (small upper square face , LH end, chosen here)
2) Apply Tools | Save as BB. If you have activated the View | Show Saved BB option, then the outline of the BB will be displayed. Deselect the face.
3) Select another element of geometry on the object (can be v/e/f or whole object) whose own BB centre you want to align with the saved BB centre. I chose the edge shown, knowing its mid point will align with the saved BB centre.
4) Apply Tools | Move to Saved BB (-> All option here). Wings moves the (same) object so that the appropriate (BB) centres become aligned (on all 3 axes)
If I had used the Move to Saved BB -> Z option (say), Wings would only have aligned along the Z axis. No (-)Y shift would have been imparted on the object (as shown here)
The above will work, whatever selection mode is used in either case. Using verts for both offers the highest degree of (perceived) precision.
Whilst using a face (or edge) will provide a precise location (in terms of where the BB centre is), knowing where that centre is, from the users point of view, is not always that easy to predict if the selected element occupies a 3D volume.
Any of the 4 selection modes (v/e/f/o) can be used for selecting the features used during the Save BB and Move to Saved BB ops. The same mode does not have to be used for both selections. Wings will calculate the relevant centres and complete the move, irrespective of the (selection) modes used.
Multiple objects can be (selected and) used (without combining) as either the mover or the non-mover items. (Using the View | Show Saved BB is highly recommended for this)
However, if you want to move several objects (as one) to a Saved BB, then you will have to combine them first.
It was stated above that the 'All' option is used in the examples - if one of the Move to Saved BB -> X/Y/Z options was chosen, then the moved item will only be displaced along the chosen axis (X, say) until its BB centre has the same X ordinate as that of the Saved BB centre.
To align items along 2 axes, then 2 separate Move to Saved BB ops are needed along the appropriate axes.
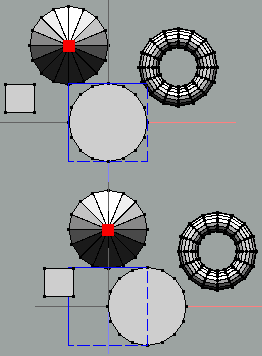
The top (circular) face of the cylinder has been selected and saved using Save as BBox. (Wings highlights the saved boundary box if requested - use View | Show saved BB - BB shown as a blue square here and in following examples)
In this example (shown in Y view), all 4 objects were selected and grouped together using Object | Combine.
The apex vert on the cone is selected and Move to Saved BB -> X is applied All 4 (combined) objects then move along the X axis (left to right, here) until the centre of the selected vert (cone apex) lies on the same X plane as the centre of the saved BBox (in this case, the centre of the blue square.
No Y or Z movement has taken place on any of the 4 objects.
The top (circular) face of the cylinder has been selected and saved using Save as BBox.
In this example (shown in Z view), all 4 objects were selected and grouped using Object | Combine.

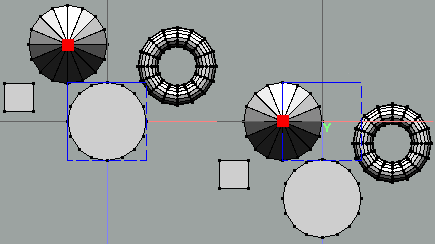
The top (circular) face of the cylinder has been selected and saved using Save as BBox.
In this example (shown in Y view), all 4 objects were selected and grouped using Object | Combine.
The apex vert on the cone is selected and Move to Saved BB -> Z is then applied. All 4 (combined) objects then move along the Z axis (downwards, here) until the centre of the selected (cone apex) vert lies on the same Z plane as the centre of the saved BBox (in this case, the centre of the blue square)
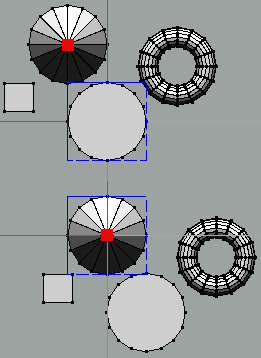
The top (circular) face of the cylinder has been selected and saved using Save as BBox.
In this example (shown in Y view), all 4 objects were selected and grouped using Object | Combine.
The apex vert on the cone is selected and Move to Saved BB -> All is then applied. All 4 (combined) objects then move along all the axes until the centre of the selected (cone apex) vert lies in the centre of the saved BBox (in this case, the centre of the blue square) - in all 3 dimensions (only X and Z shown here)
A view along the Z axis would be 'similar' to that shown for the Move to Saved BB -> Y example, insomuch that the cone apex would lie on the same Y plane.
The movement taking place in these 2 images is approx. top left -> lower right

All 4 objects were then selected and Move to Saved BB -> All was applied. (Note that they were not combined)
All 4 objects then moved such that the centre of the BBox around all 4 objects (here shown in yellow, but not actually displayed in Wings) was aligned (and coincident with) the centre of the saved BB.
Note that the cylinder (originally used to provide the Saved BB) also moves (as it now also part of a collection of items - even though they're not actually combined)
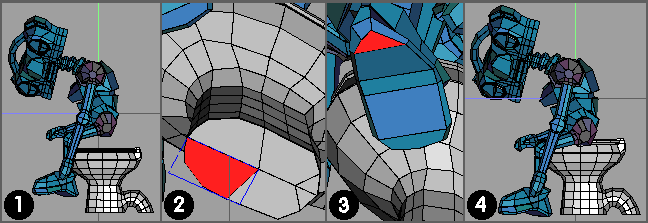
1) I wanted to align the soles of the feet with the underside of the 'pot', but leave the latter in situ. (notice the lack of an h)
2) Selected the face as shown on the base and used Tools | Save as BB - deselect face.
3) Select the face on the sole of the foot and apply Tools | Move to Saved BB -> Y (as I only needed alignment on the Y axis to take place).
4) Figure + pot after alignment. (Wings has moved the whole of the object connected to the face selected in (3) to accomlish this task)
It would have been possible to have used Tools | Align -> Y for this, but both of the objects would have moved half the Y distance between them - which was not what I wanted. (Moving both objects (downwards) would have been necessary to finish the job as required)
A procedure such as this should be considered if you were constructing a model house (say) and wanted to 'drop / place' furniture and fittings etc onto the floor.
Select the floor and apply Tools | Save as BBox
Select the part of an object you wish to be in contact with the floor surface.
Apply Tools | Move to Saved BBox -> Y
This command is not the command to use if you want to scale objects in a uniform manner.
Using this command will allow you to scale your chosen object in accordance with the dimensions of a previously defined BBox along 1,2 or 3 axes. Your (scaled) object will not necessarily finish up inside the BBox, but will still be the 'correct' size.
If scaling takes place along 2 or 3 axes, then it is likely that different scaling factors will be involved as Wings 'fits' the object into the dimensions given by the BBox.
This (probable) non uniformity of scaling will therefore result in a 'different looking' object from the original. (as opposed to one that's had Scale | Uniform used on it)
(It might help to think of the options as 1, 2 and 3 axis - as opposed to 'radial' for 2 axis ?)
Tools | Scale to Saved Bounding Box -> Radial Y

2). Since the 'target' reference (here) is the (flat) top face of the torus, select it and apply Tools | Save BBox. Assuming you have View | Show Saved BB ticked, Wings will now display the BBox around the selected geometry - in this case, it's only a 2D rectangle without any height.
3). Select the object to be scaled - hemisphere here - and apply Tools | Scale to Saved BBox -> Radial Y. (As with other radial scale tools, all scaling actually takes place along the other 2 axes associated with the chosen one - in this case, the XZ plane)
The Y distance of any (selected) vert during this op will remain constant - they are only moved along the X and Z axes.
4). The situation after the scale op. (torus hidden for clarity)
The hemisphere has been scaled (by different amounts) along both the X and Z axes, until it just fits inside the bounding box rectangle. NB - No scaling has taken place along the Y axis.
5). A plan (Y) view in ortho showing the exact shape and fit of the hemisphere. Since localised mods to these 2 circle based objects hasn't taken place, it should now be easy to join them together.
6). The BBox also provides a crucial bit of 'free' information - its position along the Y axis - since this is the face that is to be in intimate contact with the underside of the scaled hemisphere. (The 'hot spot' of any BBox lies at its geometric centre)
Select any feature associated with this underside face (I used the vert shown) and apply Tools | Move to Saved BBox -> Y. This op will align the selected element to the same Y plane as the saved BBox. (See earlier BB move examples if necessary)
7). Situation after the BB move in (6). Select both objects and apply Object | Weld.
8). Finished shape - now a single object, of course :)
Comments:
Since using any one of the single axis options (X,Y or Z) is essentially a simpler version of what's just been described - I'm not going to bother with them. If you want to undo to step 3, then apply Scale BB -> X , then Z in 2 separate goes, please do so - you'll end up with the same shape.
If trying to match specfic faces, be wary of bits of geom. 'sticking out' from the object being scaled, since this operation is based on the (invisible) BBox around the object being modified.
In this case it worked without any problems because the underface of the hemisphere (- the maximum X and Z dimensions of this object ) defined these 2 aspects of the hemisphere's (invisible) BBox.
It's worth noting, btw, that the 2 objects in question don't actually have to be in close proximity to each other (as here) - but the essential features of each do need to be in the correct relative relationship - ie no rotational mis-alignment etc.
A general note on radial scale - mentioned elsewhere (Basic page) - if you want to see the actual (local) axis about which scaling is taking place - try using Scale | Radial -> 0% - use shift to constrain. (Pick a group of adjacent faces on a sphere and try it - depending on exactly how selected verts are distributed, it can sometimes be in a surprising place)
Using the 'All' option is basically the same as the previous example, but with all 3 dimensions being scaled in accordance with the BBox. Since using a 3D (rather than 2D) BBox offers scope for a couple of extra comments, it's being mentioned.

Select an element from within the boundary formed by the BBox and apply Move | Y the required amount - ie the height that you want the hemisphere to be after being scaled. (I used the vert as shown)
2). Select the top face as shown and apply Tools | Save BBox .
3). The BBox now has a Y dimension to it - distance given by the offset vert. Now, using undo will re-instate the displaced vert back to its original position - but the BBox will remain correctly defined.
4). Situation just prior to the scale op, with undo operation completed.
5). Apply Tools | Scale to Saved BB -> All. The hemisphere is now scaled (by different amounts) along all 3 axes in accordance with the BBox dimensions. Also note that the scaled hemi has moved (Y) closer to the torus - this is because the Y distance between the 2 objects has also been scaled. (If the hemi in the first example had been offset along X and /or Z, with respect to the torus, then these offsets would have been scaled, also)
6). Just an end view showing the scaled hemi.
Doing a further BB move -> Y, as in the first example would also mate the 2 objects, prior to a weld op.
Using this tool will scale the relevant object in a uniform manner - exactly as if Object | Scale -> Uniform has been used - therefore, no change of 'shape' will take place. The difference, of course, is that the scaling factor applied, rather than via dragging or tab input, is worked out in accordance with (you've guessed it) the dimensions of a Saved BBox.
If you choose any single axis option (X, say) then the object being scaled will be changed in size (uniformly) until its X dimension matches that of the BBox X dimension.
Choosing a radial option - the smaller BBox dimension (of the 2) will be used as a reference.
All option - will ensure that the scaled object will fit inside the Saved BBox (even though it will probably have to be moved to actually 'get it inside' the BBox.
With the BBox info that's already been written, I'm not certain that there's any real need to spend much more time on this - but if someone hollers loud enough on a forum (that I visit) sometime - I might change my mind :)
I am assuming, btw, that all the above BBox info (especially the last section on scaling) has been read and tried - especially with this particular tool.
Make sure you've got View | Saved BBox ticked and mess around for a while and see what happens - try to predict how the object will be changed - before trying the op :)