(Stap 0% scales the selected geometry to a flat plane - as if flatten had been used)
However, using stap -100% effectively produces a mirrored version of the selected geometry that 'reverses' positive and negative geometry.
ie Where there was a 'protrusion' on the original, after using Stap -100% , there will be a cavity or hole shaped the same as the 'protrusion'
Unlike using Face | Mirror and Virtual Mirror, however this 'mirroring operation can be implemented around a vert / edge or face - it is not dependant on a face being chosen (as with the other 2 commands)
Although use of the command inverts the chosen object, this is simply corrected by use of Object | Invert (especially if this is on a hotkey)
In some cases, the (first) inversion might be put to good use - since another scale op based upon the object's own centreline will not only correct the inversion, but place a (non-mirrored) duplicate an equal and opposite distance from the original mirror reference plane.
Whilst this could also be achieved using Object | Duplicate -> XYZ, the user would have to work out the distances involved.

Where initially there was 'something sticking out' - after using Stap, there is now a hole / cavity of the same shape as the selected geometry. The reverse would, of course, also be true.
The 'mirror plane' in both of these examples is a Y plane passing through the selected/non-selected boundary.
This operation is not to be confused with the Face | Intrude command, which produces a 'shell' of user-defined thickness, where the inner shape follows contours of the outer, minus the 'skin thickness'.
Using Stap allows the 'hollow' / inner cavity to be a totally different shape from the 'outer shell'.
This method could be of use in situations where producing male / female moulds and their respective objects is required. It should be noted, however that if the objects are not symmetrical then 'flipping' at some stage in the procedure will be needed to correctly orientate unique 'polarising' features

Suppose you want to make a complex negative (not inverted) space - it might just be easier to make a 'standard / positive / male ' version of the feature and turn it 'inside out'
1). As an example I've created an object with a slightly complex upper region.
2). Select the geometry to be modified, taking note of where the 'reversal' plane is going to be, since this is an important datum, then invoke Face | Scale -> Y (Use RMB option, to choose a point)
3). Since the upper face of the hemisphere is going to be this 'reversal plane', select an outer edge, then press L to select the whole edgeloop. The centre of this edgeloop then becomes the point around which the scale Y op will take effect.
(In this specific case, selecting a single vert / edge that lies on the 'reversal plane' would have been sufficient to define the position in 3D space of the Y plane around which this op is working.
I used the above procedure because it appeals to my sense of symmetry :) and it shows a more general approach that could be used in situations where geometry changes are not aligned to the XYZ axes.)
Use RMB to accept selection of this feature and to execute Face | Scale -> Y (to a point).
4). Drag to minus 100% (use shift constraint) and accept

Here, the purpose is to configure the verts around the end face of the 10 sided cylinder to match the 'jagged edge' of the object on the left. Only the cylinder will be manipulated. (Either or both could be)
1). The selections show the faces to be matched. At this stage the verts on the cylinder end face could be connected up (sensibly) to their likely final configuration - but there is no need to do this now.
2). Select the first vert (on the cylinder) to be modified.
3). Apply Vert | Scale -> Uniform. (Use RMB - Pick point to scale to.)
4). Select the destination vert (on the other object) and execute Scale op with RMB by dragging to 0%, using shift constraint.(or you can use LMB to select, then RMB to execute - as I did here to allow me to take the screengrab - RMB select / execute only flashes 'the blue' very briefly)
(Doing things the '2 stage' way is sometimes useful in complex situations as it gives you a chance to 'eyeball' things at your leisure)
5). The situation after finishing with the first vert
6). Repeat for the next pair of verts.
7). Repeat for all the verts, separate objects, connect up the verts on the cylinder end face to make 4 faces - now have 2 matching (compound) surfaces.
Provided no relative rotation between these 2 objects takes place, they can be easily (re)mated using the Bounding Box commands - you could also weld them back together (although why you'd want to after so much trouble is beyond me :) ) - but you'd have to dissolve the intermediate edges on the 2 mating faces first for weld to work properly.

After much messing about to get pivot points (for the 'hinged' tailplane assembly) in the correct place etc, it was necessary to actually 'clean up' the shape of the geometry around this particular hinging area.
I sorted out one edge, then used Stap 0% on individual verts, one at a time, to re-locate them with their corresponding verts on the other part of the fuselage.
A nice, clean, well-fitting join was the result.

1)�Create your shape and Object | Duplicate (Use MMB to dupe without moving), so that both objects occupy the same volume (I've added 'lugs' to the object to help to polarise the thing) Keep the duplicate object selected.
2)�Object | Scale X -> (Use RMB, pick point to scale to) - the point you pick will essentially define the exact position along the X axis of your 'mirror plane, I chose the vert as shown in blue.
3)�Drag the duped object through the 'mirror plane' until you reach minus 100% (constrain with shift or use 'Tab entry')
4)�Finished object after inverting the result of stage 3 (pulling it 'inside out' / passing through 0% inverts it) to get the duped object back to normal.
Some comments.
Above is a simple example to demo technique - selection of a remote point (maybe on another object?) still works, and produces 2 objects with a gap between them, rather than touching - as shown here. (see next example)
Method works with multiple objects (arrays?)
Using scale uniform (with pick point) produces some interesting results - this method works with edges and verts chosen as a reference.
Worth experimenting with, imo
This trivial application / example can now be easily achieved using Face | Mirror (RMB option - mirror a separate object) When this mini tut was done, the RMB option didn't exist - I decided to leave this here because of other uses.

1) Object to be mirrored / duped - not on any main axis.
2) Want to mirror / dupe and place the dupe an equal distance (the other side of) the Z axis (say). Create some sort of reference object on the origin. (I obviously used a cube) or use a suitable existing feature that lies on the appropriate centreline. (Any v/e/f will do - provided the 'hot spot' of the element lies on the appropriate centreline)
3) Select whole object, apply Object | Duplicate (Use MMB option, dupe without moving)
4) With dupe (object) still selected, apply Object | Scale -> X (Use RMB option, Pick point to scale to). Select the top face of the cube, which will provide its centre point (shown here as the blue square) as the reference point (local origin) for the Scale op.
5) Drag the duped object until you reach minus 100% (use shft to constrain). Keep this object selected and apply Object | Invert - (dragging the dupe thro' 0% inverted it.)
6) Final situation
(Quite useful imo if you want to mirror items - on the same side of a mirror plane, rather than across one.)

1). Create sphere, loopcut / collapse polar region and Face | Mirror (or frozen VM).
Select edgeloop at intersection and bevel 0 (zero)
2). Select whichever sphere you want to be the internal surface of the 'socket'. I selected the vert at the pole and used f several times (to 'grow' the selection), to avoid possible problems around the zero width bevel.
3). Face | Scale -> Z (Use RMB, Pick point to scale to) and select the interconnecting edgeloop. (ignore the fact there's actually 2, as they both occupy the same space as far as this op's concerned)
This gives a 'scale to' point which is in the centre of the edgeloop. (a single vert on this loop would have done just as well, to 'position' the reference plane.)
4). Apply Face | Scale minus 100% and turn the selected portion 'inside out'. There are now 2 identical spherical areas (occupying the same volume) joined by a zero width bevel around the aperture periphery.
5). To give the 'socket' some thickness, I scaled down the inner surface (prob because already selected :) ) but enlarging the outer would be just as valid.
Face | Scale Uniform -> (Use RMB, Pick point etc) and choose the 'equater' ring of the sphere, to ensure scaling takes place around the centre of the sphere. (Remember that one of the 'polar' regions has been 'lopped off' - so the selection centre will shift slightly)
6). Object after scaling (about -5% )
7). After loopcutting and discarding unwanted half.
8). Another view of (7)
Drifting 'off topic' a little (lot)
9). I thought as I'd got a basic eye socket, I'd take it a little further
Create a rough 'eye' shape using whatever tools you want. I used clacos' 'Draw Loop' plugin, (excellent, btw - and well worth the d/load effort) but other options could have been vector moves on the 'thickness edges' between inner and outer shells or connect edges and vector moves. (All possible, but messy)
Only use a technique that keeps the verts on the spherical suface.
Repeat the procedure on the inside surface.
10). Select the loop and loopcut
11). Finished 'socket' after mirroring.
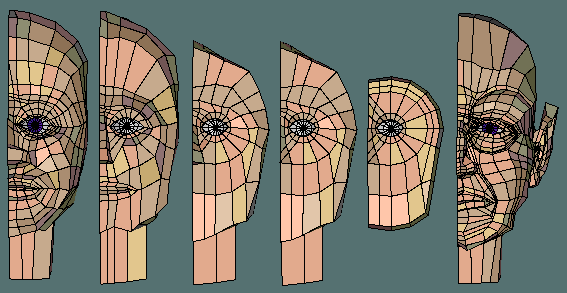
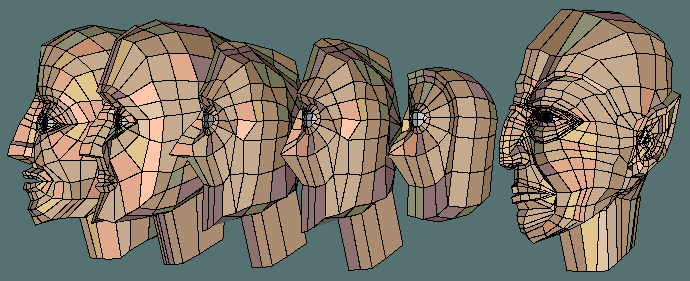
After finishing this, I wondered about building a head, using this as a starting point. (some results follow)
I know It's much easier to hollow out a sphere in this way by using intrude (lop off the polar region, select face and intrude to suit) - but IF you wanted shapes / blemishes / distortions etc on the inner surface of the sphere, intrude would roll over laughing saying 'no chance'.
The fact that I've demo'd this with something simple doesn't mean that's all it's any use for - remember imagination / creativity?

From L to R these are files # 5,4,3,2,1 and 35 - where 1 is the first saved file after some preliminary tweaking / pulling 'n poking with the tut result - I vaguely remember wondering whether to bother saving this (do I hear other ppl thinking the same?)
Whilst none of this lot will win any prizes - I think it's useful to have these (plus other intermediate versions) - to 'revisit' in the future, for further experimentation and maybe even improving as my modelling 'skills' develop. (yes, I know, but dreaming doesn't cost anything)
All because I was messing around with 'mirroring' :)
